Creating a napari plugin#
Overview#
In this tutorial, we will make a napari analysis plugin from the
detect_spots() function we wrote in the first part of this practical session.
The primary steps in making a napari plugin are as follows:
Choose which manifest contribution(s) your plugin requires
Create your repository using the napari-plugin-template
Implement your contributions
Share your plugin with the community
In the following sections, we will work through steps (1) - (3). To set up a minimal plugin, you can read the “Your first plugin” tutorial on napari.org. A functional napari plugin only needs 4 files to be shared with the community, but you will find many other helpful files in the template that make plugins easier to develop and maintain. For step (4), you can refer to the in depth plugin tutorial, or the deploy instructions on napari.org.
Choosing a contribution#
A contribution is a construct in napari.yaml (the manifest file), that napari
uses for each specific type of plugin. Each contribution conforms to a function
signature, i.e. the function linked to the contribution defines what napari
provides to the plugin (e.g., data and parameters) and what the plugin returns
to napari. napari is then able to use the functions pointed to in napari.yaml
to carry out the plugin tasks. Please see the
contributions guide for more details.
(And technical references for the
manifest and
contributions.
Many plugins will declare multiple contributions to provide all of the desired
functionality.
The current categories of contributions are described below:
reader: allows loading of specified data formats into napari layers;
writer: this allows layer data to be written to disk in specified formats;
sample data: allows developers to provide users with sample data with their plugin;
widget: allows custom Qt widgets (GUIs) to be added to napari, either from a
magic_factorywidget, a plain function, or a subclass of QWidget;theme: allows customization of the entire napari viewer appearance e.g. light theme or dark theme.
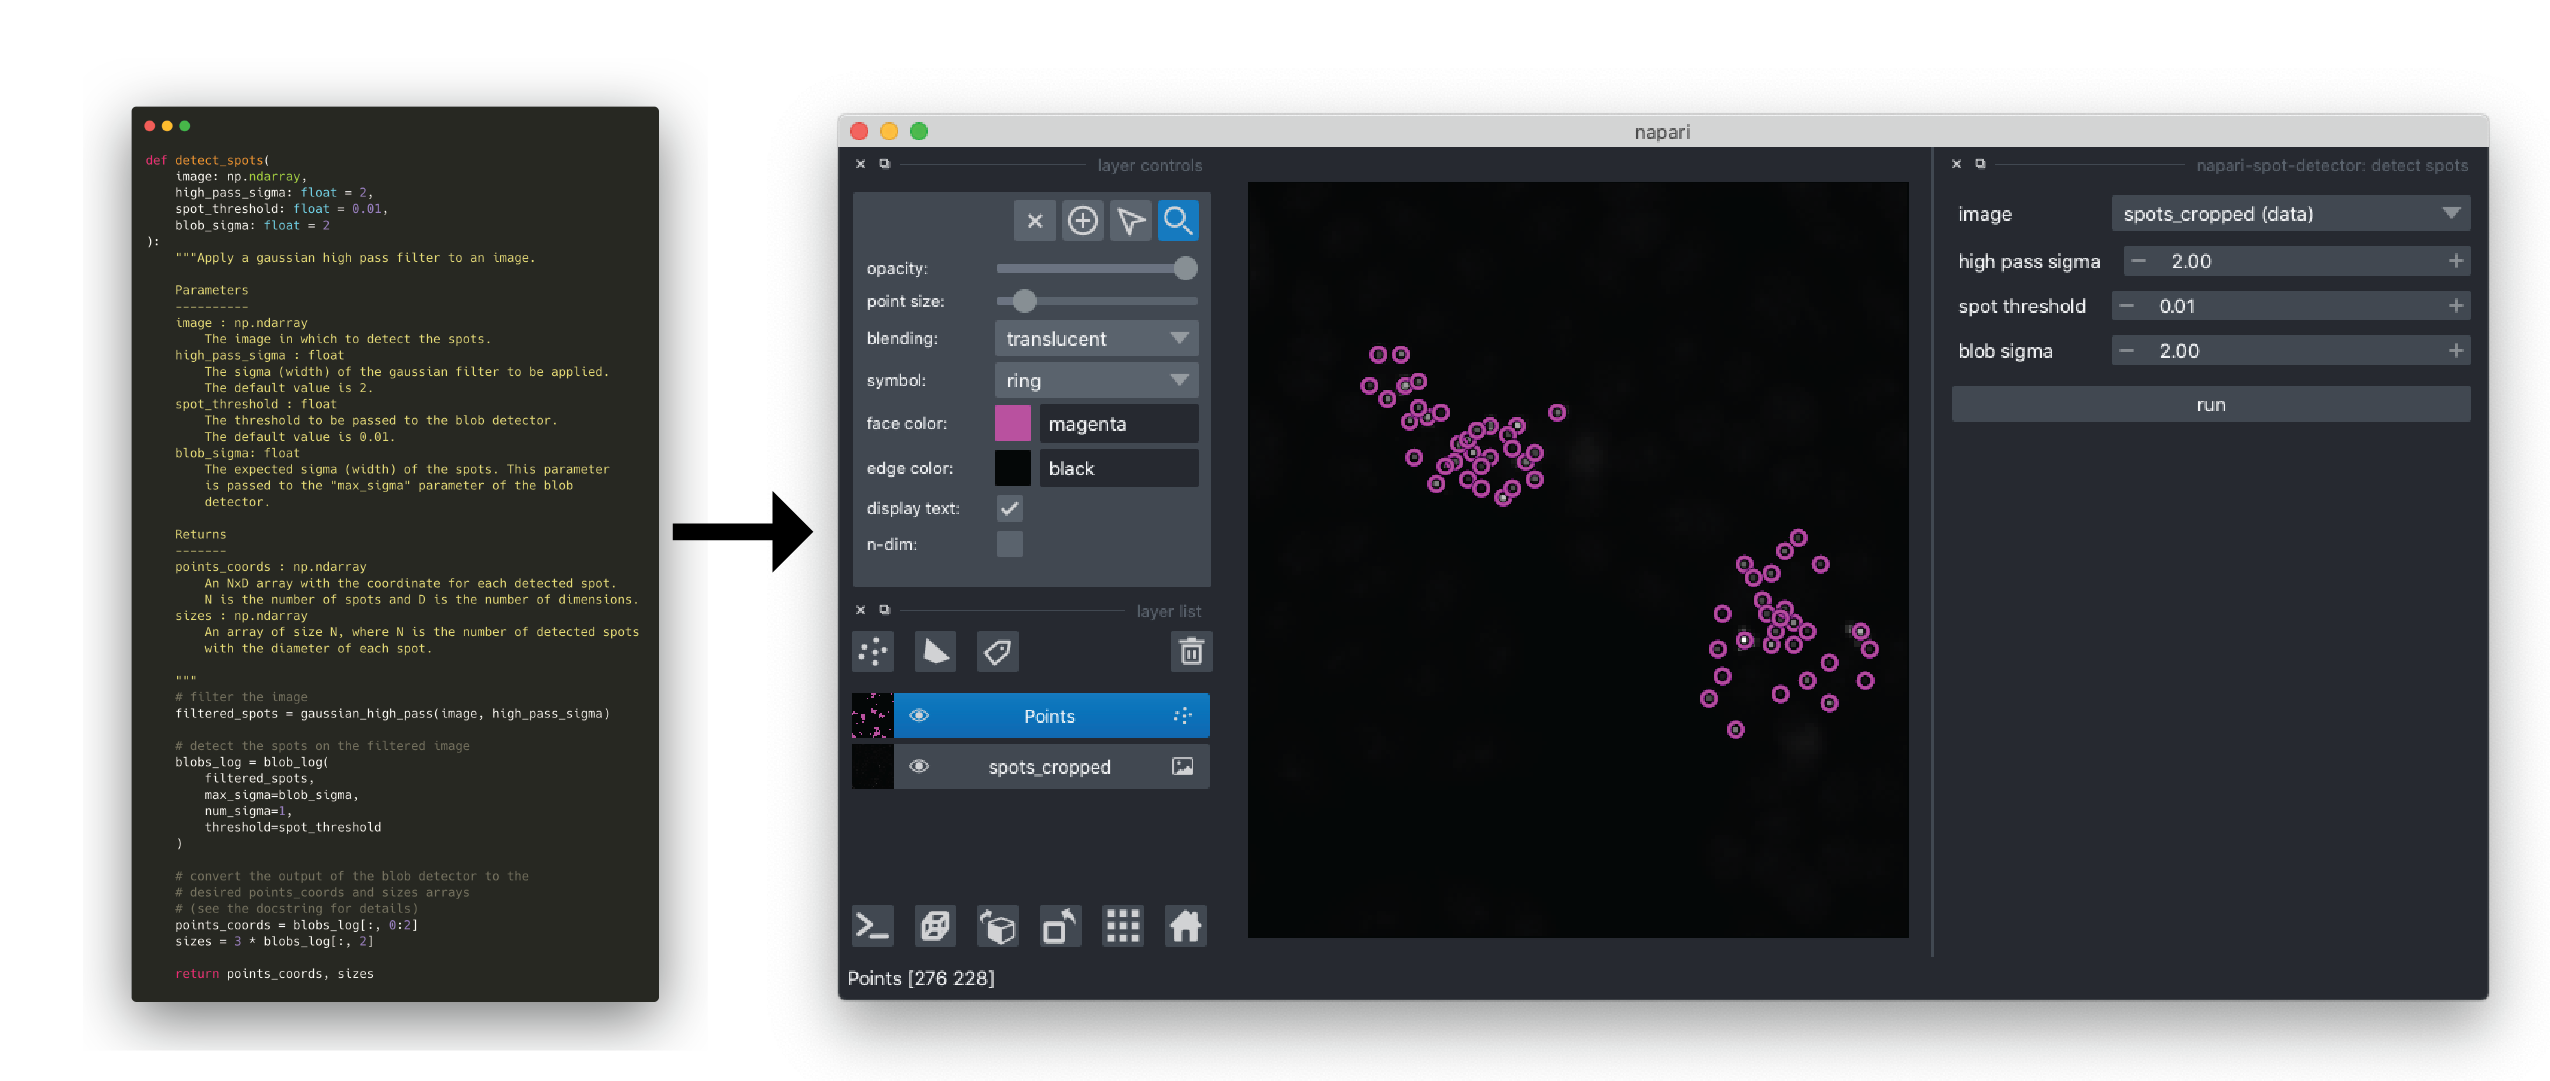
In this tutorial, we will create a spot detection plugin by implementing a
widget contribution with the spot detection function (detect_spots()) we
created in the first part of this practical session.
Using the copier napari-plugin-template to create your plugin repository#
To make creating the creating plugins easier, we provide a template that
automatically builds most of the infrastructure for your plugin, so you can
focus on implementing the details unique to your plugin. The template is
implemented using a command line utility called
copier.
In the following steps, you will build your plugin directory using the
napari-plugin-template template.
First, open your terminal and navigate to the folder where you want the plugin folder to be created. As before, we recommend using your Documents folder:
cd ~/Documents
Next, activate the conda environment you created in the first part of the tutorial and install the necessary packages to run the template.
conda activate napari-workshop
conda install copier jinja2-time npe2
In this next step, we will use copier to create a directory for our
plugin from the template. The template will ask a series of questions that
will customize the directory for your plugin. Once completed, a new directory
will be created in your current directory. It will come pre-initialized with a
git repository. Replace <new-plugin-name> with the name you would like to
call your plugin.
copier copy --trust https://github.com/napari/napari-plugin-template <new-plugin-name>
Alternatively, you can use a single command to start the template with uv:
uv tool run --with jinja2-time --with npe2 copier copy --trust https://github.com/napari/napari-plugin-template <new-plugin-name>
You will be asked for some information to customize the setup of your plugin.
Each prompt gives the default value in square brackets ([]). Enter your answer
after the prompt and press enter to continue. When prompted for which plugins
to include, you only need to answer Yes to Include widget plugin?,
but you may be interested in exploring the other contributions as well.
To read more about the prompts, you can refer to the napari-plugin-template
Prompts Reference
After completing all of the questions, a directory will be created containing
your new napari plugin. You will be given instructions on how to upload the
initialized git repository to GitHub. By default, we will not be covering this
aspect in the tutorial, but please feel free to ask the teaching team if you
would like to give it a try. Your new plugin directory (assuming you called the
plugin napari-spot-detector and the module napari_spot_detector) will be
organized as follows.
napari-spot-detector
├── .github
|   ├── ISSUE_TEMPLATE
|   |   ├── bug_report.yml
│   |   ├── documentation.md
│   |   ├── feature_request.md
│   |   └── task.md
│   ├── workflows
│   |   └── test_and_deploy.yml
|   ├── PULL_REQUEST_TEMPLATE.md
│   └── dependabot.yml
├── .napari-hub
│   ├── DESCRIPTION.md
|   └── config.yml
├── src
│   └── napari_spot_detector
│       ├── _tests
│       │   ├── __init__.py
│       │   └── test_widget.py
│       ├── __init__.py
│       ├── napari.yaml
│       └── _widget.py
├── .gitignore
├── .pre-commit-config.yaml
├── LICENSE
├── MANIFEST.in
├── pyproject.toml
├── README.md
└── tox.ini
See below for explanations about some of the most notable files, but do not hesitate to reach out to the teaching team if you have questions about any of the other files.
.github/workflows/test_and_deploy.yml: This is a github actions workflow that will automatically run the tests and upload your plugin to pypi (thus making it available through the built-in napari plugin browser. Please ask the teaching team if you would like to learn how to set up your github repository to support this workflow.pyproject.toml: This file allows your plugin to be built as a package and installed by pip. Thenapari-plugin-templatehas set everything up in these files, so you are good to go!The
src/folder contains all the Python code for your plugin.src/napari_spot_detector/_widget.py: This file contains example implementations for different widget contributions. This is where you will add yourdetect_spot()function.The
src/napari_spot_detector/napari.yamlfile declares commands and contributions for each example widget in the_widget.pyfile. Look at these carefully and match up which command & contribution belong to what Python code in the_widget.pyfile.
You have now set up the directory for your new plugin! You can explore the
directory and files with the file browser. In the next step, you will complete
your plugin by adding your detect_spots() function to the _widget.py file.
Implementing a widget contribution#
In this step, we will implement our detect_spots() function as a plugin
contribution. First, we will add our spot detection function to the plugin
package. Then, we will add the type annotations to the function so that
napari can infer the correct GUI elements to add to our plugin.
To edit your plugin source code, open an integrated development environment (VSCode is a good, free option) or text editor.
In VSCode, open the directory you created with
copierin the section above.From the “File” menu, select “Open…”
Navigate to and select the directory you created with
copier(~/Documents/napari-spot-detectorif you called your pluginnapari-spot-detector).
You should now see your plugin directory in the “Explorer” pane in the left hand side of the window. You can double click on folders to expand them and files to open them in the editor.
Open the
src/<module_name>/_widget.pyfile using VSCode by double clicking on it in the “Explorer” pane.You will see that it has already been populated with a few code blocks by the template.
At the top, you see the imports. You can leave unchanged for now.
Next, you see four different ways to add widgets to napari.
The first is a pure Python function flagged with
autogenerate: truein the plugin manifest. Type annotations are used by magicgui to generate widgets for each parameter. This is best suited for simple processing tasks - usually taking in and/or returning a layer.The second option is a
magic_factorydecorated function. Themagic_factorydecorator allows you to customize aspects of the resulting GUI, including the widgets associated with each parameter. This is best used when you have a very simple processing task, but want some control over the autogenerated widgets.The third option is a
magicgui.widgets.Containersubclass. This provides lots of flexibility and customization options while still supportingmagicguiwidgets and convenience methods for creating widgets from type annotations. If you want to easily customize your widgets and connect callbacks, this is the best widget option for you.The fourth option subclasses
QWidgetdirectly. This provides maximal flexibility but requires full specification of widget layouts, callbacks, events, etc.
For this tutorial, we’ll focus on the first approach (the autogenerate function) since it’s the simplest and most suitable for our spot detection function. This means our function doesn’t need to know anything about magicgui. If we provide type annotations to the parameters, the GUI widgets will be generated for us without even a decorator!
Find the
CommandID innapari.yamlthat points tothreshold_autogenerate_widget, and then find thatCommandID in theWidgetscontribution section. Note that unlike the otherwidgetcontributions, this one includesautogenerate: true.- command: napari-spot-detector.make_func_widget autogenerate: true display_name: Example Function Widget
Let’s edit
threshold_autogenerate_widgetto do our spot detection.
You can keep all the example functions in
_widget.pyfor reference, or you can delete the ones you don’t need. If you delete any functions, make sure to also delete the associatedCommandsandWidgetcontributions fromnapari.yaml, and update the imports innapari_spot_detector/__init__.py!Copy the
gaussian_high_pass()anddetect_spots()functions from your notebook from the first part of the tutorial and add them to the file.Next, we need to modify
detect_spots()to work as a napari widget. You can either modify the existingthreshold_autogenerate_widgetfunction or create a new function. The function should return the necessary layer data so that napari can create a newPointslayer with our detected spots. Ifdetect_spots()returns aLayerDataTuple, napari will add a new layer to the viewer using the data in theLayerDataTuple.The layer data tuple should be:
(layer_data, layer_metadata, layer_type)layer_data: the data to be displayed in the new layer (i.e., the points coordinates)layer_metadata: the display options for the layer stored as a dictionary. Some options to consider:symbol,sizelayer_type: the name of the layer type as a string (i.e.,'Points')
Add type annotations to the function parameters (inputs). napari (via magicgui) will infer the required GUI elements from the type annotations. We have to add annotations to both the parameters (i.e., inputs to the function) and the return type.
Annotate the Return type as
"napari.types.LayerDataTuple".Add the required imports for the
scipy.ndimagemodule andscikit-imageblob_log()function to the top of the file.from scipy import ndimage as ndifrom skimage.feature import blob_log
Finally, we need to add the function to the
napari.yamlfile so that napari can find the declarations of the plugin without having to import every module at startup. You can read more about how to properly declare a widget in the Contributions Reference. In addition, we can declare plugin contributions to napari menus so that users can find your contributions according to intended use.
_function.py solution#
See below for an example implementation of the _widget.py file, and the
associated changes to napari.yaml
# _widget.py
from typing import TYPE_CHECKING
import numpy as np
from scipy import ndimage as ndi
from skimage.feature import blob_log

if TYPE_CHECKING:
    import napari


def gaussian_high_pass(image: np.ndarray, sigma: float = 2):
    """Apply a gaussian high pass filter to an image.

    Parameters
    ----------
    image : np.ndarray
        The image to be filtered.
    sigma : float
        The sigma (width) of the gaussian filter to be applied.
        The default value is 2.

    Returns
    -------
    high_passed_im : np.ndarray
        The image with the high pass filter applied
    """
    low_pass = ndi.gaussian_filter(image, sigma)
    high_passed_im = image - low_pass

    return high_passed_im


def detect_spots(
    image: "napari.types.ImageData",
    high_pass_sigma: float = 2,
    spot_threshold: float = 0.01,
    blob_sigma: float = 2
) -> "napari.types.LayerDataTuple":
    """Apply a gaussian high pass filter to an image.

    Parameters
    ----------
    image : napari.types.ImageData
        The image in which to detect the spots.
    high_pass_sigma : float
        The sigma (width) of the gaussian filter to be applied.
        The default value is 2.
    spot_threshold : float
        The threshold to be passed to the blob detector.
        The default value is 0.01.
    blob_sigma: float
        The expected sigma (width) of the spots. This parameter
        is passed to the "max_sigma" parameter of the blob
        detector.

    Returns
    -------
    layer_data : napari.types.LayerDataTuple
        The layer data tuple to create a points layer
        with the spot coordinates.

    """

    # filter the image
    filtered_spots = gaussian_high_pass(image, high_pass_sigma)

    # detect the spots
    blobs_log = blob_log(
        filtered_spots,
        max_sigma=blob_sigma,
        num_sigma=1,
        threshold=spot_threshold
    )
    points_coords = blobs_log[:, 0:2]
    sizes = 3 * blobs_log[:, 2]

    layer_data = (
        points_coords,
        {
            "face_color": "magenta",
            "size": sizes
        },
        "Points"
    )
    return layer_data
#napari.yaml
name: napari-spot-detector
display_name: Spot Detection
contributions:
  commands:
    - id: napari-spot-detector.make_detect_spots_widget
      python_name: napari_spot_detector._widget:detect_spots
      title: Make spot detection widget
  widgets:
    - command: napari-spot-detector.make_detect_spots_widget
      autogenerate: true
      display_name: Spot Detection
  menus:
    napari/layers/segment:
      - command: napari-spot-detector.make_detect_spots_widget
Explore the other files generated by napari-plugin-template#
In order for napari to automatically find and make your plugin available to the
user once it has been installed (i.e., “discoverable”), we must add a
napari.manifest entry point to the pyproject.toml file. An entry point is a way
that a Python package can advertise that it has a component available (our
plugin in this case). napari searches the python environment for packages that
have a napari.manifest and then uses the path in the entry_point to find
napari.yaml, where all your plugin functionality is declared.
If we open the pyproject.toml file created by the template, we see that the entry
point was already added by the template! If you called your plugin
napari-spot-detector and your module napari_spot_detector, you will see the
following:
[project.entry-points."napari.manifest"]
napari.manifest =
    napari-spot-detector = "napari_spot_detector:napari.yaml"
Note that src doesn’t occur in the path to napari.yaml, but napari.yaml is
definitely within the src folder! Python knows to look inside the src folder
for your code because pyproject.toml declares so with the following:
[tool.setuptools.packages.find]
where = ["src"]
Installing and trying out your plugin#
To use our plugin, we need to install it in our Python environment.
First, return to your terminal and verify you have the napari-workshop
environment activated. Then, navigate to the directory that you created with the
template. For example, if you named your plugin napari-spot-detector, you
would enter the following into your terminal.
cd ~/Documents/napari-spot-detector
Then, we install the plugin with pip. pip is the package installer for Python
(see the documentation for more information).
We will use the -e option to install in “editable” mode. This means that when
we make a change to our source code, it will update the installed package the
next time it is imported, without us having to reinstall it.
pip install -e .
To confirm if your installation completed successfully, you can launch napari from the command line.
napari
Once napari is open, you can open your plugin from the “Plugin” menu. You can
test your plugin by locating the spots image from the tutorial notebooks folder
we downloaded at the beginning of this tutorial in the File browser
(<path to notebook folder>/data/stardist_masks.tif), dragging the image into
the napari viewer, and try running the plugin.
Congratulations! You have made your first napari plugin!
Bonus exercises#
In case you have finished all of the exercises with some time to spare, we have provided some ideas for ways that you can extend the plugin. Please feel free to give them a go and ask the teaching team if you have any questions.
Add sample data to your plugin. To do so, you would need to implement the sample data contribution
Add an option to your
detect_spots()function plugin to return the filtered image in addition to the points layer.Add some tests to the
_tests/test_widget.pyfile.Upload your plugin to github
Start your own plugin
Consult with the teaching team about integrating napari into your workflow